By the end of this guide, you will have created your first Leap Feature and have a working HTTP Endpoint that you can communicate with. At this time, the Leap CLI is only intended for development in a Windows environment.
Setup Leap Project Using Leap CLI
Now that you have configured the Leap CLI, creating your first Leap Feature is just a few moments away!
Create a Directory for the Project
# Pick any Directory where you'd like to create your project
# For this demo let's create the "intro" folder

mkdir intro
Initialize Project Structure and Database
Before starting this step, make sure you’ve installed the latest version of the Leap CLI mentioned in the Leap CLI Installation Guide.
# move into our new "intro" directory
cd intro

# Leap CLI to initialize
leap-cli -init "local"
Verify Configuration
If Leap CLI was successful you will see a log in your CMD “Leap application initialized!” and you will have a bunch of new directories inside of /intro.
For the purpose of this guide, you only need to pay attention to the /config, /services, and /software directories. That is where we will making our customizations in the upcoming steps.
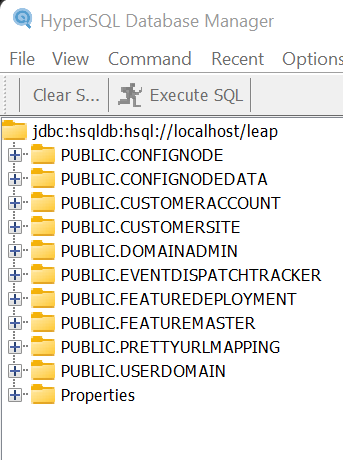
The first thing you should verify is that the schema “leap” was created in HSQLDB and has the required Leap tables present.
Connect and Verify HSQLDB
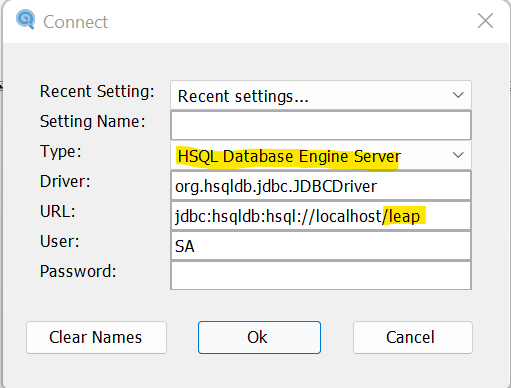
In order to view the contents of the HSQLDB instance, you must run the “runManagerSwing.bat” file located at <project>/attunedlabs/software/hsql/bin/
Change the connection type to “Server” and append the schema named “leap” to the connection string.

Once you’ve acced HSQLDB, you will see the following tables. After verifying the DB, close the HSQLDB interface and continue in this tutorial.

Create Your First Feature
Update Framework Configuration
The CLI has automatically updated the /attunedlabs/config/local/globalAppDeploymentConfig.properties file to let the framework know which schema to use when talking with the Database. By default, Leap uses a schema named “leap”.
Read more about using a custom schema in the Leap CLI Commands documentation.

Create a New Feature
# Create a new Feature within the Project

# Navigate to the /intro/attunedlabs/services directory and execute the following command

# -a "intro" is the name of the folder in /services
# -g "com.attunedlabs" is the maven groupId to use
# -fg "testing" is the name of the Feature Group of the Feature
# -fn "first" is the name of the Feature we're creating
# -impl "welcome" is the specific name for this Feature implementation
# -ven "attunedlabs" is the vendor of the Feature
# -p "local" causes the build to occur for your local environment

leap-cli –a “intro” –g “com.attunedlabs” –fg “testing” –fn “first” –impl “welcome” –ven “attunedlabs” –p “local”
Once this command has finished, you will see the log “New feature create!” and you’ll notice that we’ve created a new Maven project called “intro” that contains a Leap Feature named “first”, which belongs to a logical group called “testing”.
Feature groups may also contain other Features with similar goals. It may take some time to finish as the project will automatically build after adding a new Feature.
Because a Feature implementation could vary per tenant in a multi-tenant deployment, the implementation name “welcome” is used to identify our particular Feature.
If you take a peek at the /services directory, you will see the new folder “intro”.
Tweaking the New Service
Change the Service Output
Now that our new Feature is created, it’s time for us to make our mark by customizing the default service. We’ll run the service in the final step of this guide.
Navigate to: attunedlabs/config/local/testing/first/welcome/attunedlabs/routes/first-welcome-impl.xml and edit the text inside of the <simple> tags. In this case I’m simply appending “world” to the end of the text “hello” that is already present.
<!-- first-welcome-impl.xml -->

<route id="testing-first-hello-world-welcome-attunedlabs-implRoute">
   <from uri="direct:testing-first-hello-world-welcome-attunedlabs-IR" />
   <setBody>
      <simple>Hello World</simple>
   </setBody>
   <to uri="direct:first-hello-world-executionExitRoute" />
</route>
Run the Project
Even though we made an edit in the Feature Implementation Route, we do not need to build the Feature before running it.
Finally! We can try the -run command to start the Leap Framework in our command line and make our new Feature available.
# Run Leap Project from /attunedlabs/services

leap-cli -run
If the framework was successfully started, you should see something like the image below in a separate command line window that the CLI opened automatically.

Testing Your Leap Feature
You can use any application you’d like for testing the endpoint, but, in this guide, we’ll be using Postman.
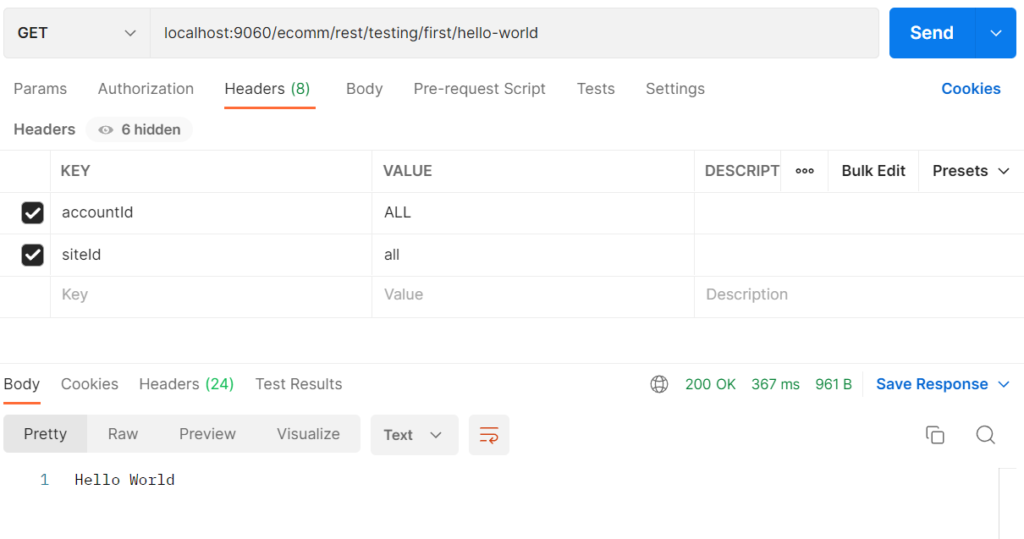
Simply start a new HTTP GET request with the following details and press “Send”:
- Headers
- accountId = ALL
- siteId = all
- URL
- localhost:9060/ecomm/rest/testing/first/hello-world

In the example below, we’re calling our service “hello-world” and setting the appropriate header values. Although they are not used in this case, these headers act as a hint to tell Leap which service to call when Leap is running in a multi-tenant environment.
If your Feature was created successfully and is currently running, you will see the same result as the image below.

Next Steps:
Congratulations! If you have made it this far, you have successfully configured the Leap-CLI tool and created your first Leap Feature.
To further your understanding of Leap and and the CLI, the following articles are strong recommended:
- Leap CLI Commands
- Leap JSON Format
- Eventing with Leap
- More guides to come…
