By the end of this guide, you will have created your first Leap Feature and have a working HTTP Endpoint that you can communicate with. This guide uses Leap CLI commands issued via PowerShell, the same commands are supported for Windows, Mac, and Linux.
Setup Leap Project Using Leap CLI
Now that you have configured the Leap CLI, creating your first Leap Feature is just a few moments away!
Create a Directory for the Project
# Pick any Directory where you'd like to create your project
# For this demo let's create the "intro" folder

mkdir intro
Initialize Project Structure and Database
Before starting this step, make sure you’ve installed the latest version of the Leap CLI mentioned in the Leap CLI Installation Guide.
# move into our new "intro" directory
cd intro

# Leap CLI to initialize, may take several seconds to run
leap-cli -init "local"
Verify Configuration
If Leap CLI was successful you will see the message from Leap CLI “Leap application initialized!“. You will notice that a new directory attunedlabs has been added inside of your workspace.
For the purpose of this guide, you only need to pay attention to the /config, /services, and /software directories within attunedlabs. That is where we will making our customizations in the upcoming steps.
Create Your First Feature
Create a New Feature
# Create a new Feature within the Project

# Navigate to the /intro/attunedlabs/services directory and execute the following command

# -a "hello" is the name of the folder in /services
# -g "com.softeon" is the maven groupId to use
# -fg "training" is the name of the Feature Group of the Feature
# -fn "helloworld" is the name of the Feature we're creating
# -impl "first" is the specific name for this Feature implementation
# -ven "softeon" is the vendor of the Feature
# -p "local" has the build use configurations from the "local" config directory

leap-cli –a “intro” –g “com.attunedlabs” –fg “testing” –fn “first” –impl “welcome” –ven “attunedlabs” –p “local”
Once this command has finished, you will see the log “New feature created!“. Notice that we’ve created a new Maven project called “hello” that contains a Leap Feature named “helloworld”, which belongs to a logical group (Feature Group) called “training”.
It may take some time to finish as the project will automatically build after adding a new Feature.
Because the specific details of a Feature implementation may vary per tenant in a multi-tenant deployment, the implementation name “first” is used to identify this particular Feature. Vendor implementations (overload) of Features is a more advanced topic for another time.
If you take a peek at the /services directory, you will see the new folder “hello”. This is simply a Maven project with the Leap Framework already added as a dependency in the POM as well as a featureMetaInfo configuration file added in the project’s resources directory.
Add a New Service to your Feature
Adding the “test” Web Service
Now that our new Feature is created, it’s time for us to make our mark by adding a our own web service and providing some basic output text. We’ll run the service in the final step of this guide.
Add Service via Leap CLI
# Navigate inside of your new feature
cd hello

# Add the new service
leap-cli -addservice "test" -httpMethod "GET" -pretty "hwtest"
The -pretty flag is optional. The value of this flag configures your feature to make this web service available at the default URL as well as the URL provided. More on this during our final test. You should now see “Services added!” in your terminal.
Open the file: attunedlabs/config/local/training/helloworld/first/softeon/routes/training-helloworld-first-impl.xml and locate your new service at the bottom of the file. Edit the text inside of the <simple> tags. In this case I’m simply appending “world” to the end of the text “hello” that is already present.
Save the file.
<!-- Implementation Route -->

<route id="training-helloworld-test-first-softeon-implRoute">
    <from uri="direct:training-helloworld-test-first-softeon-IR" />
    <setBody>
	<simple>Hello World</simple>
    </setBody>
    <to uri="direct:helloworld-test-executionExitRoute" />
</route>
Run the Project
Even though we made an edit in the Feature Implementation Route, we do not need to build the Feature before running it. All files inside /config are loaded at runtime.
Finally! Use the -run command to start the Leap Framework in your terminal to make your feature available.
# Run Leap Project from /attunedlabs/services
cd ..

# Command to start your Feature
leap-cli -run
Depending on your environment, it make a few moments for your feature to start. In the new terminal that was opened, you will see MANY logs, for now you can ignore most of them.
When the logging stops you should see the final few logs look something like the image below.

Testing Your Leap Feature
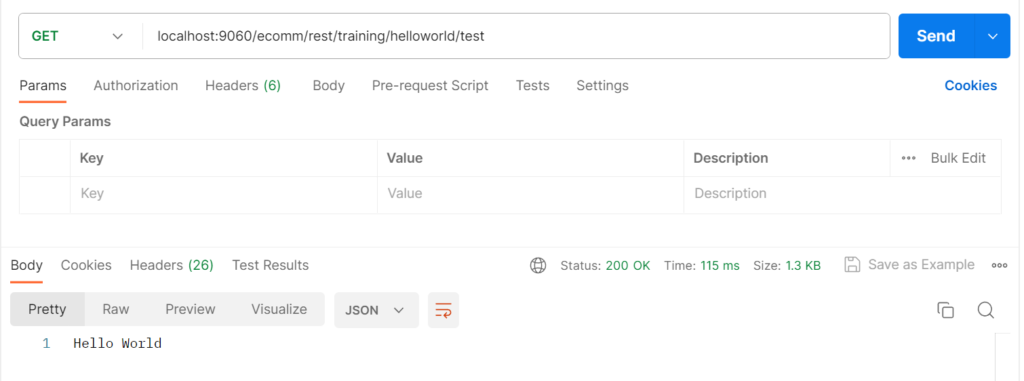
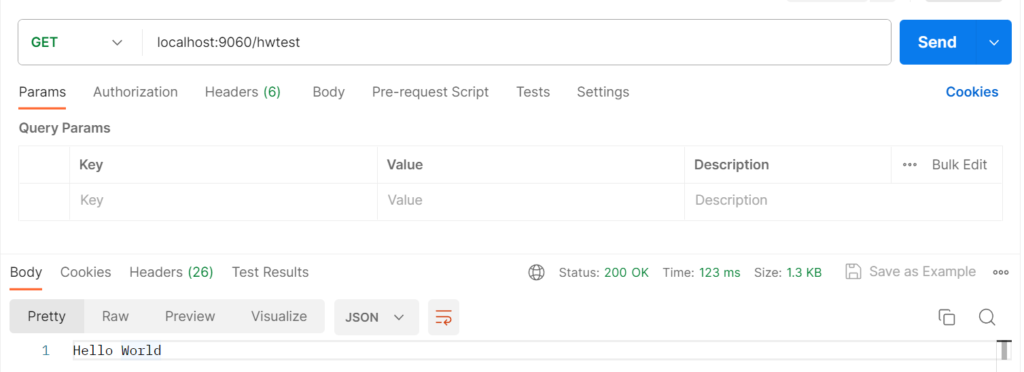
You can use any application you’d like for testing the endpoint, but, in this guide, we’ll be using Postman.
Simply a new HTTP GET request with the following details and press “Send”:
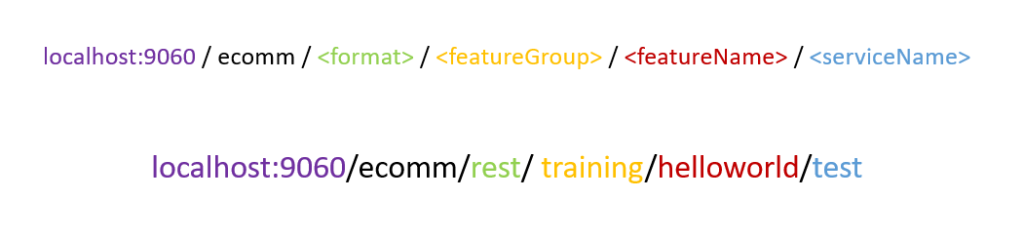
- URL(s) to test
- localhost:9060/ecomm/rest/training/helloworld/test
- (pretty) localhost:9060/hwtest
In the example below, we’re calling our “test” web service using the default URL as well as the pretty URL.
If your Feature was created successfully and is currently running, you will see the same result as the image(s) below.
Cleaning Up After Yourself:
To stop your Leap application, go back to your terminal and give the -shutdown command to Leap CLI. This safely closes your application, shuts down the database server, and kills the underlying processes that use HTTP ports.
# Clean Leap Application Shutdown

leap-cli -shutdown
Next Steps:
Congratulations! If you have made it this far, you have successfully configured the Leap-CLI tool and created your first Leap Feature!
To further your understanding of Leap and and the CLI, the following articles are strong recommended:
- Leap CLI Commands (v2 coming soon)
- Leap JSON Format
- Eventing with Leap
- More guides to come…