Description
Leap CLI is a command-line interface created with one primary purpose: Enabling Developers. With the help of Leap CLI, you will spend less time configuring projects and creating tedious boilerplate code. Instead, with a few simple commands, you will be customizing a Leap Feature and composing solutions.
Leap CLI v2.x is available for Windows, Linux, and MacOS.
Download Latest Leap CLI
The Leap CLI v2.1.0 can be downloaded directly from the respective GitHub repository or sent to you from the Leap/LUCA team. If you do not have access to the necessary repository, please send an email to request access.
Prerequisites
Before you can set up the Leap CLI, make sure that you have installed and configured the following prerequisites:
- Java OpenJDK 11 – (download)
- Set %JAVA_HOME% environment variable
- Apache Maven 3.8.6 – (download)
- Install Guide
- Set %MAVEN_HOME% environment variable
Windows
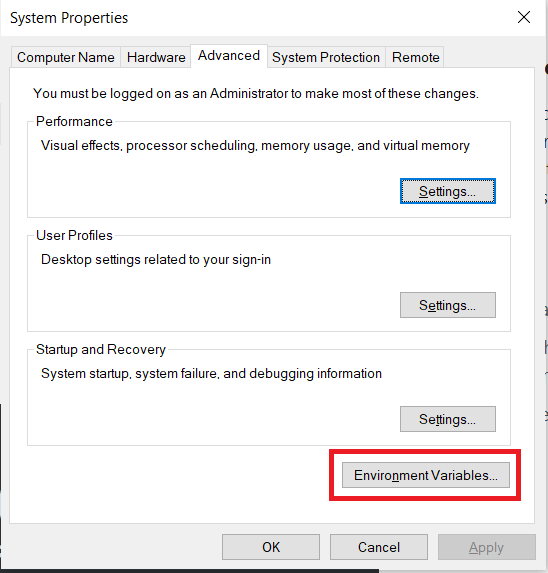
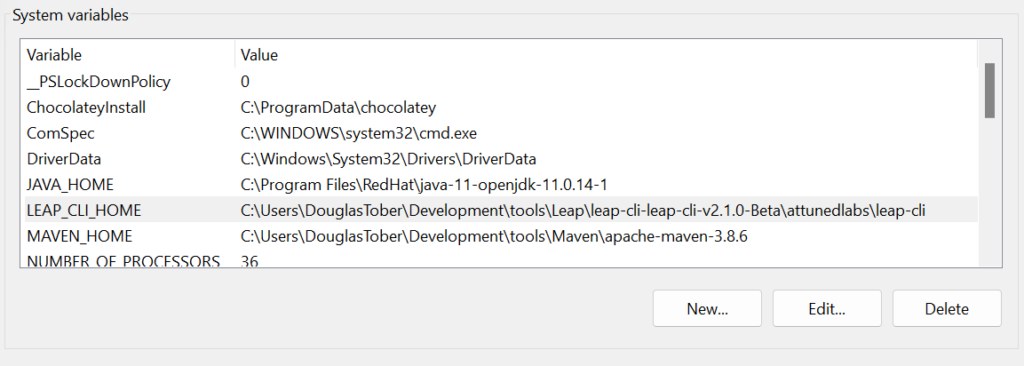
Set Environment Variables
Once the CLI has been downloaded and you have placed it where it will remain on your PC, you must configure the:
- LEAP_CLI_HOME environment variable
- Add %LEAP_CLI_HOME%\exec\windows to your existing “path” variable
Linux
Environment Variables and Permissions
Once the CLI has been downloaded and you have extracted it where it will remain on your PC, you must configure the following, where {install directory} is the location you extracted Leap CLI:
- LEAP_CLI_HOME environment variable
- Add %LEAP_CLI_HOME%/exec/linux to your existing “path” variable in bashrc
export LEAP_CLI_HOME={install directory}/attunedlabs/leap-cliexport PATH=${LEAP_CLI_HOME}/exec/linux:${PATH}
- Give permission to Leap CLI using
chmod +x *from within{install directory}/attunedlabs/leap-cli/exec/linux
MacOS (Intel)
Environment Variables and Permissions
Once the CLI has been downloaded and you have extracted it where it will remain on your PC, you must configure the following, where {install directory} is the location you extracted Leap CLI:
- LEAP_CLI_HOME environment variable
- Add %LEAP_CLI_HOME%/exec/mac to your existing “path” variable
export LEAP_CLI_HOME={install directory}/attunedlabs/leap-cliexport PATH=$LEAP_CLI_HOME/exec/mac:$PATH
- Give permission to Leap CLI using
chmod +x *from within{install directory}/attunedlabs/leap-cli/exec/mac
Verify Installation
Now that you’ve configured the prerequisites and set up the environment variables for the Leap CLI, the only thing left to do is test it!
Open a new CMD/Terminal in any directory and type the -version command to verify the CLI is working properly.
leap-cli -version
If you were successful in setting up the CLI, you will see an output similar to this image.

Getting Started with Leap CLI
Finally! You’re ready to create your first Leap Application using the Leap QuickStart Guide! Please reference the Leap CLI Commands v2 (coming soon) page for more information about all of the commands supported by the current Leap CLI.