Brief Architecture
When developing new Forms and Flows it’s not necessary for a complete understanding or in-depth coverage of all parts of the Form Flow Engine. Instead, we will focus on the parts of the architecture that we will be interacting with the most: Web Client and Engine Client.
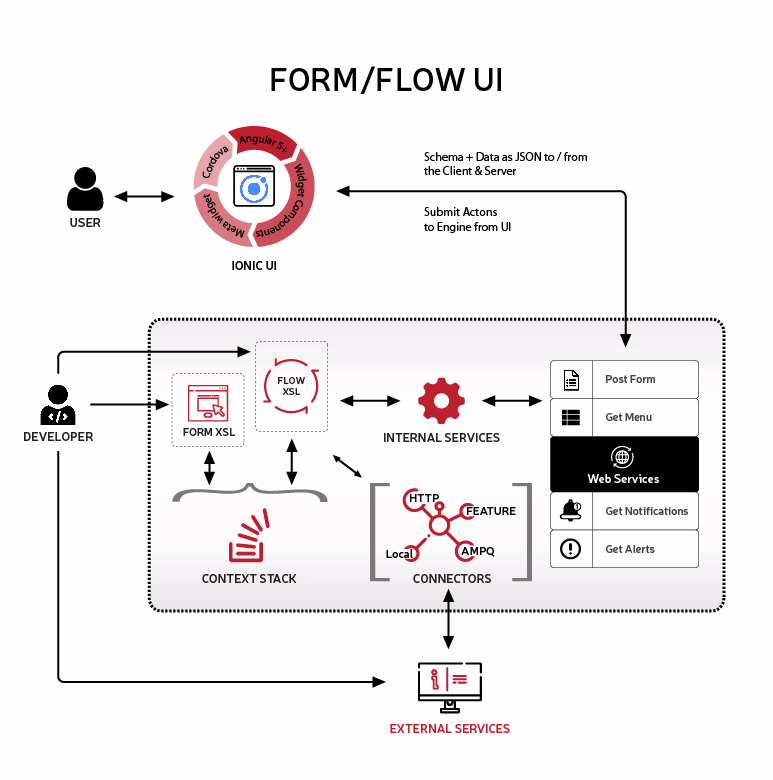
Web Client (UI)
Currently, the Web Client is an Ionic 3 (Ionic v5 in progress) project that leverages Angular 5+ and Cordova. This allows us to build and deploy as a Progressive Web App (PWA), Web App, or Hybrid Mobile App.
The Web Client can be built in many ways; depending on the device it will displayed on. Currently, we support Android, iOS (beta), HTML5 Web Browsers, and pre-HTML5 Browsers – generally used on RF devices. Pre-HTML5 Browsers use a different version of the Web Client that is built with AngularJS (v1).
There are two responsibilities of the Web Client:
- Consume the JSON payload from the Engine Client and render the screen based on the current application state
- Collect information from end-users and return it to the Engine for processing
Engine Client (Server-side)
The Engine Client is a Java based LEAP Feature that is responsible for not only interpreting the Form and Flow XML files, but is also handling connections to external services. Connectors to external services are created within the Engine Client and allow for either requesting additional data to populate our Form Data, submitting Data that has been collected, or simply calling a piece of business logic that is embedded as static code.
This Feature is the single point of contact for the UI. Every HTTP request is routed through this Feature. As such, the state of the user is also stored on the backend; not the UI.
With each HTTP request from the UI to the Server, the front-end will be rendered again based on the instructions provided by the Engine client.
What is Flow?
Flow is a representation of a workflow or process that is performed based on a set of rules and guidelines. Our definition of Flow is purposefully vague as the definition of any Flow XSL file is provided by its implementer.
Often, a diagram is created as a visual representation of a workflow; this diagram demonstrates the interconnectivity of each stop that needs to be completed in a Flow. This is exactly what our flow file represents, the “bumpers” that keep our process on track. Since each part of a process is modular and can be re-used later, we leverage the Flow to piece together our individual modules and mark them up with logic as necessary.
Individual Flows are represented as a Template in an XSL file. It is possible to have more than one Flow in the same file. However, only do this if the flows are closely related as to avoid support confusion.
What is a Form?
A Form is a single template that represents a piece of work that needs to be done or data that needs to be collected. Forms are used for displaying and collecting information in a structured format, to fulfill a specific process in a greater workflow. Forms are the parts that are strung together by a Flow when defining the UI application.
We represent a Form with an XML file that is comprised of one more Template, Properties, their attributes, and logical conditions. When the Client UI wants to render a Form, the Form XML is first evaluated and transformed into JSON format by the Schema Service within the Engine Client, then sent to the UI as an HTTP Response.
For a full list of currently supported properties and their configurations, check the Widget Catalog.
Form and Flow Example
A simple form/flow for a login screen might be dictated:
Display a Field that requests a username. If a username is entered, show the password Field. Submit the credentials after both are entered.
– Project Manager
<?xml version="1.0" encoding="utf-8" ?>
<xsl:stylesheet xmlns:xsl="http://www.w3.org/1999/XSL/Transform" version="2.0">

  <!-- First Flow Segment (index) to collect only the username -->
  <xsl:template match="context[form = 'index']">
    <flow>
      <!-- Render the Form with the matching Name attribute -->
      <xsl:call-template name="usernameOnlyForm" />

      <!-- Once the user sends a response, test for username -->
      <next>
        <xsl:choose>
          <!-- If username exists, collect password in next flow -->
          <xsl:when text="(outgoing/username)">
            passwordFlow
          </xsl:when>
          <!-- If username doesn't exist, stay on this flow, re-render -->
          <xsl:otherwise>
            index
          </xsl:otherwise>
        </xsl:choose>
      </next>
    </flow>
  </xsl:template>


  <!-- Second Flow Segment (passwordFlow) to collect and validate user -->
  <xsl:template match="context[form = 'passwordFlow']">
    <flow>
      <!-- Render the corresponding Form -->
      <xsl:call-template name="usernameAndPasswordForm" />

      <!-- Validate the data from the user before entering "Next" -->
      <after>
        <xsl:copy-of select="connector:call('com.attunedlabs.loginConnector.validateCreds', outgoing/username, outgoing/password )" />
      </after>

      <!-- Handle flow navigation -->
      <next>
         <xsl:choose>
          <!-- If the credentials are valid, go to the Welcome Screen -->
          <xsl:when text="(global/validLogin)">
            welcomeScreenFlow
          </xsl:when>
          <!-- Back to initial flow if creds are invalid-->
          <xsl:otherwise>
            index
          </xsl:otherwise>
        </xsl:choose>
      </next>
    </flow>
  </xsl:template>
</xsl:stylesheet>
<?xml version="1.0" encoding="utf-8" ?>
<xsl:stylesheet
  xmlns:xsl="http://www.w3.org/1999/XSL/Transform" version="3.0">

  <!-- Renders only one input field for Username -->
  <xsl:template name="usernameOnlyForm">
    <form title="Login" >
      <!-- Customize the property with attributes such as "required", "readonly", etc  -->
      <property
        name="username"
        title="Username"
        type="string"
        required="true"
        submit="true" />

      <action title="Submit" name="submitUsername" submit="true" />
    </form>
  </xsl:template>

  <!-- Renders the username and password -->
  <xsl:template name="usernameAndPasswordForm">
    <form title="Login" >
      <!-- Changed to "readOnly" when asking for password -->
      <property
        name="username"
        title="Username"
        type="string"
        readOnly="true" />

      <!-- "masked" attribute to hide the password from plain-text -->
      <property
        name="password"
        title="Password"
        type="string"
        required="true"
        masked="true"
        submit="true" />

      <action name="validateCredentials" submit="true" />
    </form>
  </xsl:template>
</xsl:stylesheet>
The Payload
It is important that we briefly cover the Payload as this is the data which is being transferred between the Engine and UI. The Payload is a representation of the current UI state and is composed of three (3) main parts: Token, Model, and Schema.
- Token – A numerical token or timestamp (provided by the Engine) that indicates the last request between the UI and Engine. This token must be updated and passed back from UI to Engine with each new request.
- Model – This section of the Payload represents the key-value pairs of data that fulfill the requirements of our Schema. These are the actual values associated with our UI form and are mapped into Context accordingly. An example might be the
usernamefrom the previous code example. - Schema – A description of the current form to be rendered. This behaves as a sort of contract between the Server and the Client, where the Server generates the Schema based on a Form XML file and the UI renders an HTML form as described by the schema.
{
  "data": {
    "token": 123456789,
    "model": {
        "username": "Doug"
    },
    "schema": {
      "properties": {
        "username": {
          "title": "Username",
          "type": "string",
          "required": "true",
          "submit": "true"
        },
        "submitUsername": {
          "type": "action",
          "title": "Submit"
        }
      }
    }
  }
}
Parts of a Flow file
Template
The Template tag (<template>) is where we configure the contextual name for a given Flow. By providing a value in the Match attribute we can reference this template from any other Flow. This is commonly used when we navigate between multiple different Flows from within their Next block.
In the example below, we see a Template that is defined as the ‘index’ template; this is the name that we can use when referencing this template in our Flow – each Template will have its own name respectively. Multiple Templates can exist in a single XML file, this is a widespread practice when two templates are closely related to each other.
<?xml version="1.0" encoding="utf-8" ?>
<xsl:stylesheet
  xmlns:xsl="http://www.w3.org/1999/XSL/Transform" version="2.0">
  <xsl:template match="context[form = 'index']">
    <!-- Flow goes in here -->
  </xsl:template>
</xsl:stylesheet>
Flow
The Flow block (<flow>) represents a container for all the Flow specific blocks that the Engine uses to interpret each part of the Flow lifecycle. This block exists directly inside of the Template tag and must surround the Before, Call-Template, After, and Next blocks; which are each a part of the Flow lifecycle. The Engine iterates over the Flow file in a top-down fashion and in the order listed above.
<?xml version="1.0" encoding="utf-8" ?>
<xsl:stylesheet
  xmlns:xsl="http://www.w3.org/1999/XSL/Transform" version="2.0">
  <xsl:template match="context[form = 'index']">
    <flow>
      <!-- Flow lifecycle here -->
    </flow>
  </xsl:template>
</xsl:stylesheet>
Before
The Before block (<before>) is the first step in the lifecycle of a Flow. It may be beneficial to think of the before block as a constructor – in an Object-Oriented Language such as Java – we can use it for doing some setup before rendering a template. Just as the name suggests, Before is executed directly before pulling in the Form XML.
This block is optional; however, it can be very powerful in both Flows that are designed to be executed only one time and Flows that are cyclical by design. Before gives us the ability to do the following before sending our Form Data/Schema to the Client UI:
- Retrieve Data from Context
- Request Data from a Service
- Make a method call to a Connector
- Evaluate logical conditions based on Context
<?xml version="1.0" encoding="utf-8" ?>
<xsl:stylesheet
  xmlns:xsl="http://www.w3.org/1999/XSL/Transform" version="2.0">
  <xsl:template match="context[form = 'index']">
    <flow>
      <before>
        <!-- load all data in "global" context -->
        <copy-of select="global/*" />
      </before>
    </flow>
  </xsl:template>
</xsl:stylesheet>
<?xml version="1.0" encoding="utf-8" ?>
<xsl:stylesheet
  xmlns:xsl="http://www.w3.org/1999/XSL/Transform" version="2.0">
  <xsl:template match="context[form = 'index']">
    <flow>
      <before>
        <!-- Call a Connector -->
        <copy-of select="connector:call(com.service, incoming/data)" />
      </before>
    </flow>
  </xsl:template>
</xsl:stylesheet>
Call-Template
Call-Template is a built-in XSL property (<xsl:call-template name=’xyz’ />) and behaves much as a function call does. The way that we use Call-Template is to specify which Form file we will want to display on the client UI. This property is the only required part of the Flow lifecycle and must contain the name attribute – this is where we specify the template name of our Form to be rendered.
It’s important to note that the Flow is read in a top-down fashion and it will seemingly pause its execution after it reaches the Call-Template property. This is the only property that causes such behavior; once the Form has been called, it is transformed to JSON, it’s data is mapped from Context and both are sent to the client UI as a Payload to be rendered.
Once the Form has been rendered, the only way to continue through the lifecycle steps is to make a response to the Engine from the client UI with an updated payload. Once the response is received, the data will be loaded into Context and made available to the following lifecycle steps.
<?xml version="1.0" encoding="utf-8" ?>
<xsl:stylesheet
  xmlns:xsl="http://www.w3.org/1999/XSL/Transform" version="2.0">
  <xsl:template match="context[form = 'index']">
    <flow>
      <call-template name="formToRender" />
    </flow>
  </xsl:template>
</xsl:stylesheet>
After
The After block has the same functionality as the Before block. It is important to understand that the After block is only executed once the UI has rendered a Form and the UI has sent back some data, via network request. Now that we have received a response from the client UI we can take action on that data! Just as with the Before block we can do the following:
- Retrieve Data from Context
- Request Data from Services
- Make a method call to a Connector
- Evaluate logical conditions based on Context
One difference is that we are now able to process data that has been supplied by the user, through our UI. This is very important because for the first time in our application’s lifecycle we are able to make decisions based on the information provided by an end-user. This information may be critical for deciding what action our application will take next and help to guide business logic that must be executed.
<?xml version="1.0" encoding="utf-8" ?>
<xsl:stylesheet
  xmlns:xsl="http://www.w3.org/1999/XSL/Transform" version="2.0">
  <xsl:template match="context[form = 'index']">
    <flow>
      <before></before>
      <call-template name="formToRender" />
      <after></after>
    </flow>
  </xsl:template>
</xsl:stylesheet>
Next
The Next block (<next>) is the final piece of the Flow lifecycle. Within this block we must choose:
(1) to remain in the same workflow
(2) if we have satisfied the requirements for this flow and should move on to another flow.
To do this, we simply reference the template match attribute of the flow that we want to be directed to next. Commonly, we will have some XSL logic inside of the Next that will help us decide which flow to use next – most often this will be an XSL Choose.
<?xml version="1.0" encoding="utf-8" ?>
<xsl:stylesheet xmlns:xsl="http://www.w3.org/1999/XSL/Transform" version="2.0">
  <xsl:template match="context[form = 'passwordFlow']">
    <flow>
      <xsl:call-template name="usernameAndPasswordForm" />

      <after>
        <xsl:copy-of select="connector:call('com.attunedlabs.loginConnector.validateCreds', outgoing/username, outgoing/password )" />
      </after>

      <!-- Handle flow navigation -->
      <next>
         <xsl:choose>
          <!-- If the credentials are valid, go to the Welcome Screen -->
          <xsl:when text="(global/validLogin)">
            welcomeScreenFlow
          </xsl:when>
          <!-- Back to initial flow if creds are invalid-->
          <xsl:otherwise>
            index
          </xsl:otherwise>
        </xsl:choose>
      </next>
    </flow>
  </xsl:template>
</xsl:stylesheet>